


20% off our most popular bundle
Was $109.99 Now $87.99

Introduction
Rope or paracord is a must-have tool in the great outdoors, as it serves many purposes.
You can use it to secure your camp or tarp, build a shelter, or even create a cooking tripod.
But what's the point of carrying a rope if you don't know how to use it?
So, whether you're an experienced outdoor enthusiast or just beginning to explore the beauty of nature, having a strong foundation in knot tying is essential.
In a previous blog post titled "Back to Basics: A Guide to Primitive Bushcraft Techniques," we briefly covered three crucial knots.
However, in this article, we plan to dig deeper into these three knots and introduce four more essential knots.
Throughout this piece, we will delve into:
-
Knot terminology
-
The Square (Reef) Knot
-
Sheet Bend
-
Taut-Line Hitch
-
Clove Hitch
-
Square Lash
-
Shear Lash
-
Bowline Knot
Are you ready to uncover the world of knotting?
It might seem a bit complex at first, but in reality, it's not all that challenging when you get started.
Knot Terms
Before we start demonstrating various knots, it's crucial to clarify the specific words used in knot-tying.
While most people say 'knot' when they mean tying ropes together or securing them to things like trees, it's important to know there are different types of knots.
When you combine the two ends of ropes, that's called a 'knot.'
If one end of a rope is attached to a tree or a ring, that's called a 'hitch.'
Lastly, when you use a rope to hold two or more spars or poles together, that's called a 'lash.'
Moreover, it's essential to familiarize yourself with key terms commonly used in knot-tying:
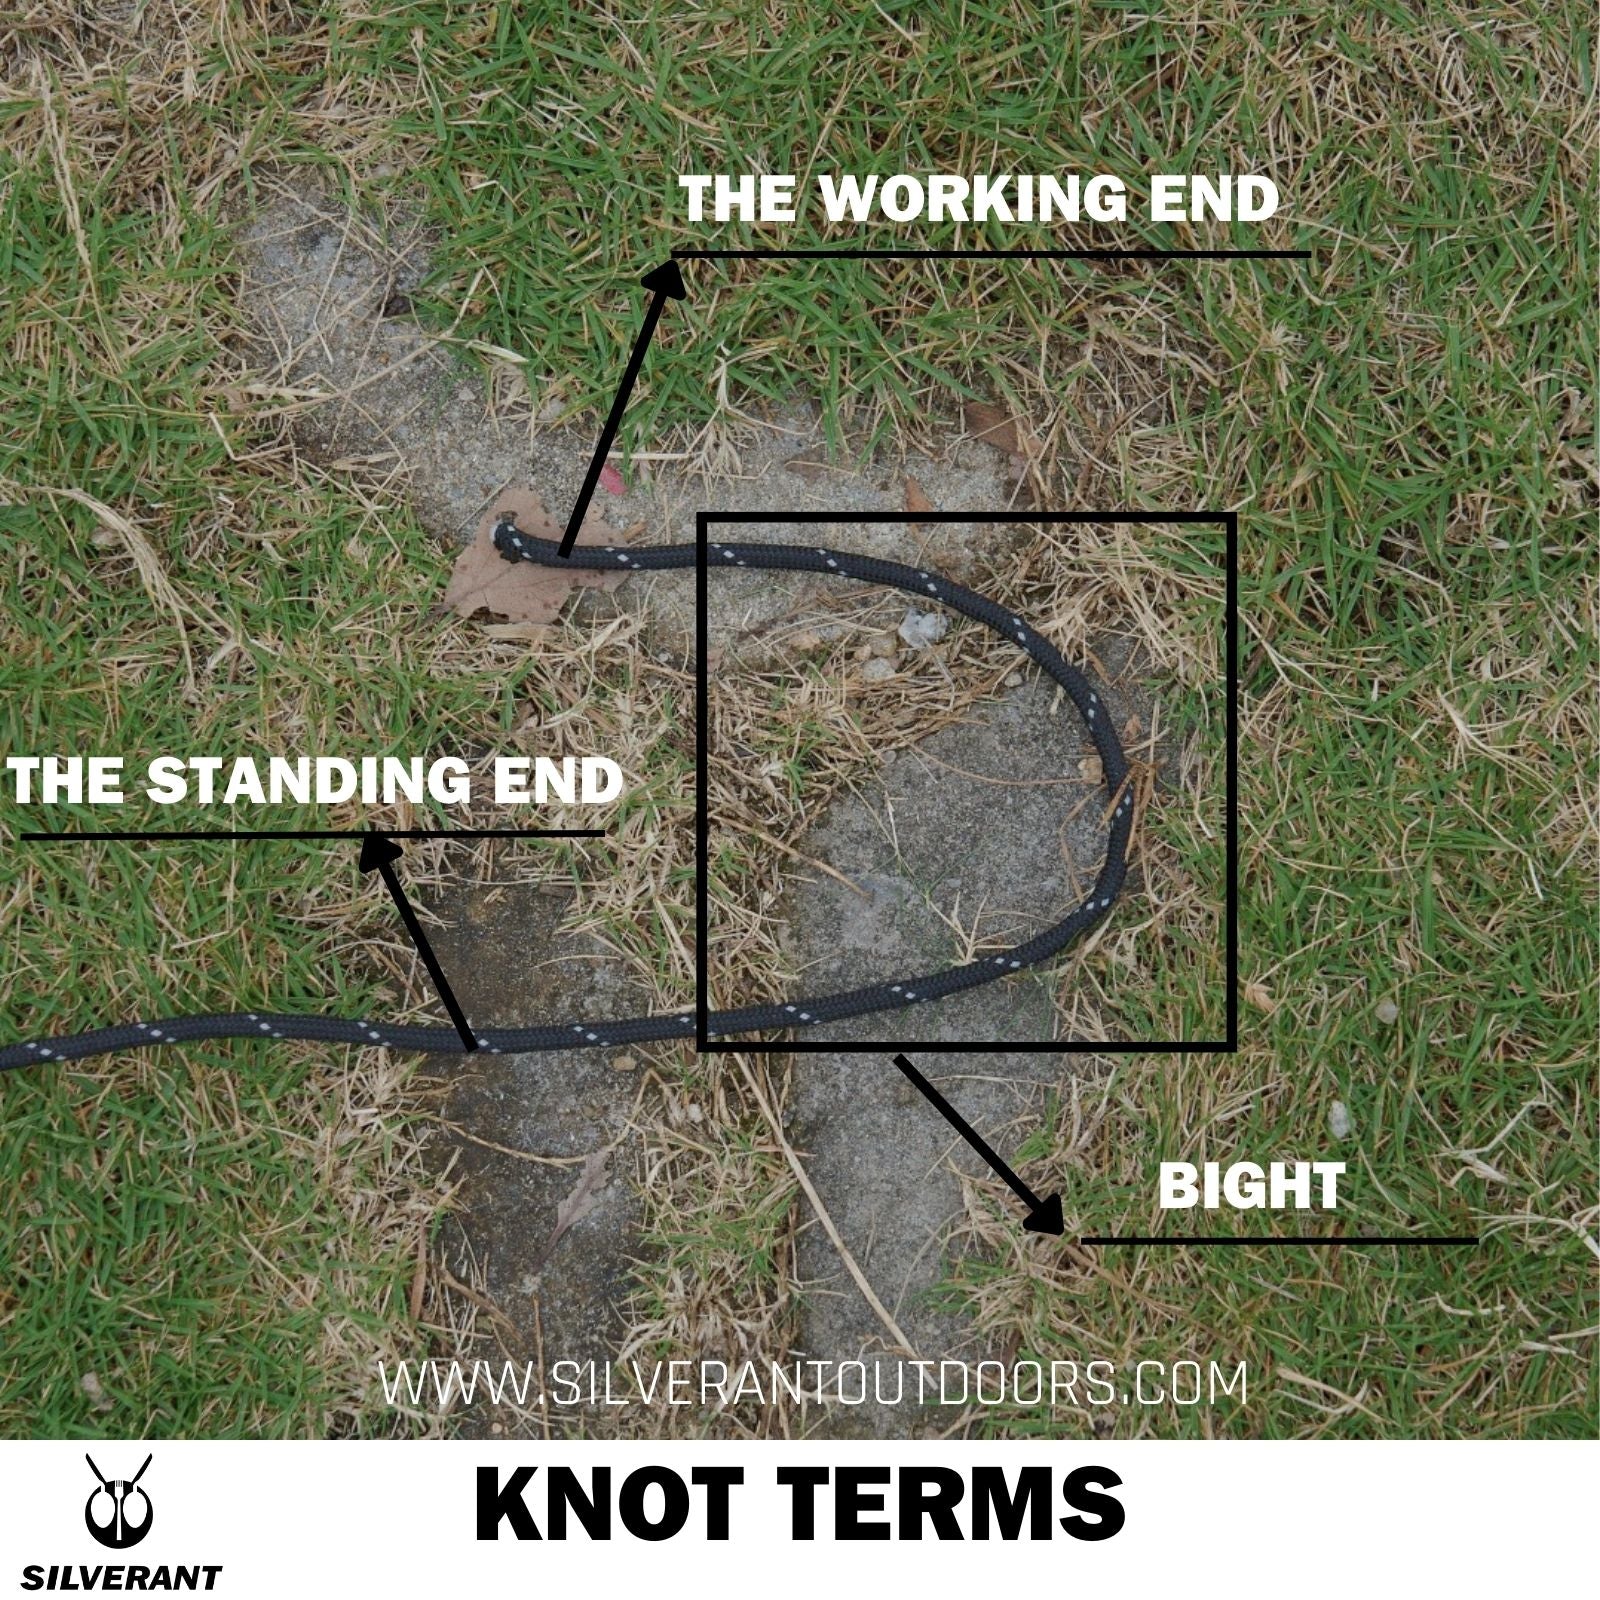
The working end (also referred to as the working part) of a rope is the section actively involved in the process of tying knots.
It stands in direct contrast to the standing end, and some guys also refer to it as the running end or free end.
The standing end (or standing part) of a rope remains stationary during the knot-tying process.
It serves as the opposite counterpart to the working end.
A bight is created by folding back a segment of the rope against itself, forming a U shape.
Understanding these terms is crucial as you delve into the realm of knots.
As we progress through the following sections, where we explore the seven knot-tying techniques, you will gain a more comprehensive grasp of these terms.
The Square (Reef) Knot
To begin, we delve into the Square Knot, often referred to as the Reef Knot. It is a simple yet incredibly practical knot.
It's ideal for uniting two ropes of the same size.
Furthermore, it serves as a crucial starting point for mastering more advanced knots and holds many practical applications.
Practical Uses
To begin with, when you find yourself in need of a longer rope, the Square Knot comes to the rescue.
By employing this knot, you can combine two ropes into a single, extended line, allowing you to reach greater distances.
For instance, I encountered a situation where I was setting up a tarp with a ridgeline, but my ridgeline turned out to be too short!
As a solution, I connected two of my ropes together to bridge the gap.
Whether you're bundling firewood or securing packages, the Square Knot proves to be your go-to choice.
It guarantees that your bundles and packages stay firmly and securely fastened.
Furthermore, in emergency situations, the Square Knot can serve as a resourceful way to connect pieces of fabric or bandages.
While it doesn't replace the need for proper medical care, it provides a temporary solution for securing dressings when you're out in the wilderness.
Now, it's time to delve into the technique of tying the square knot.
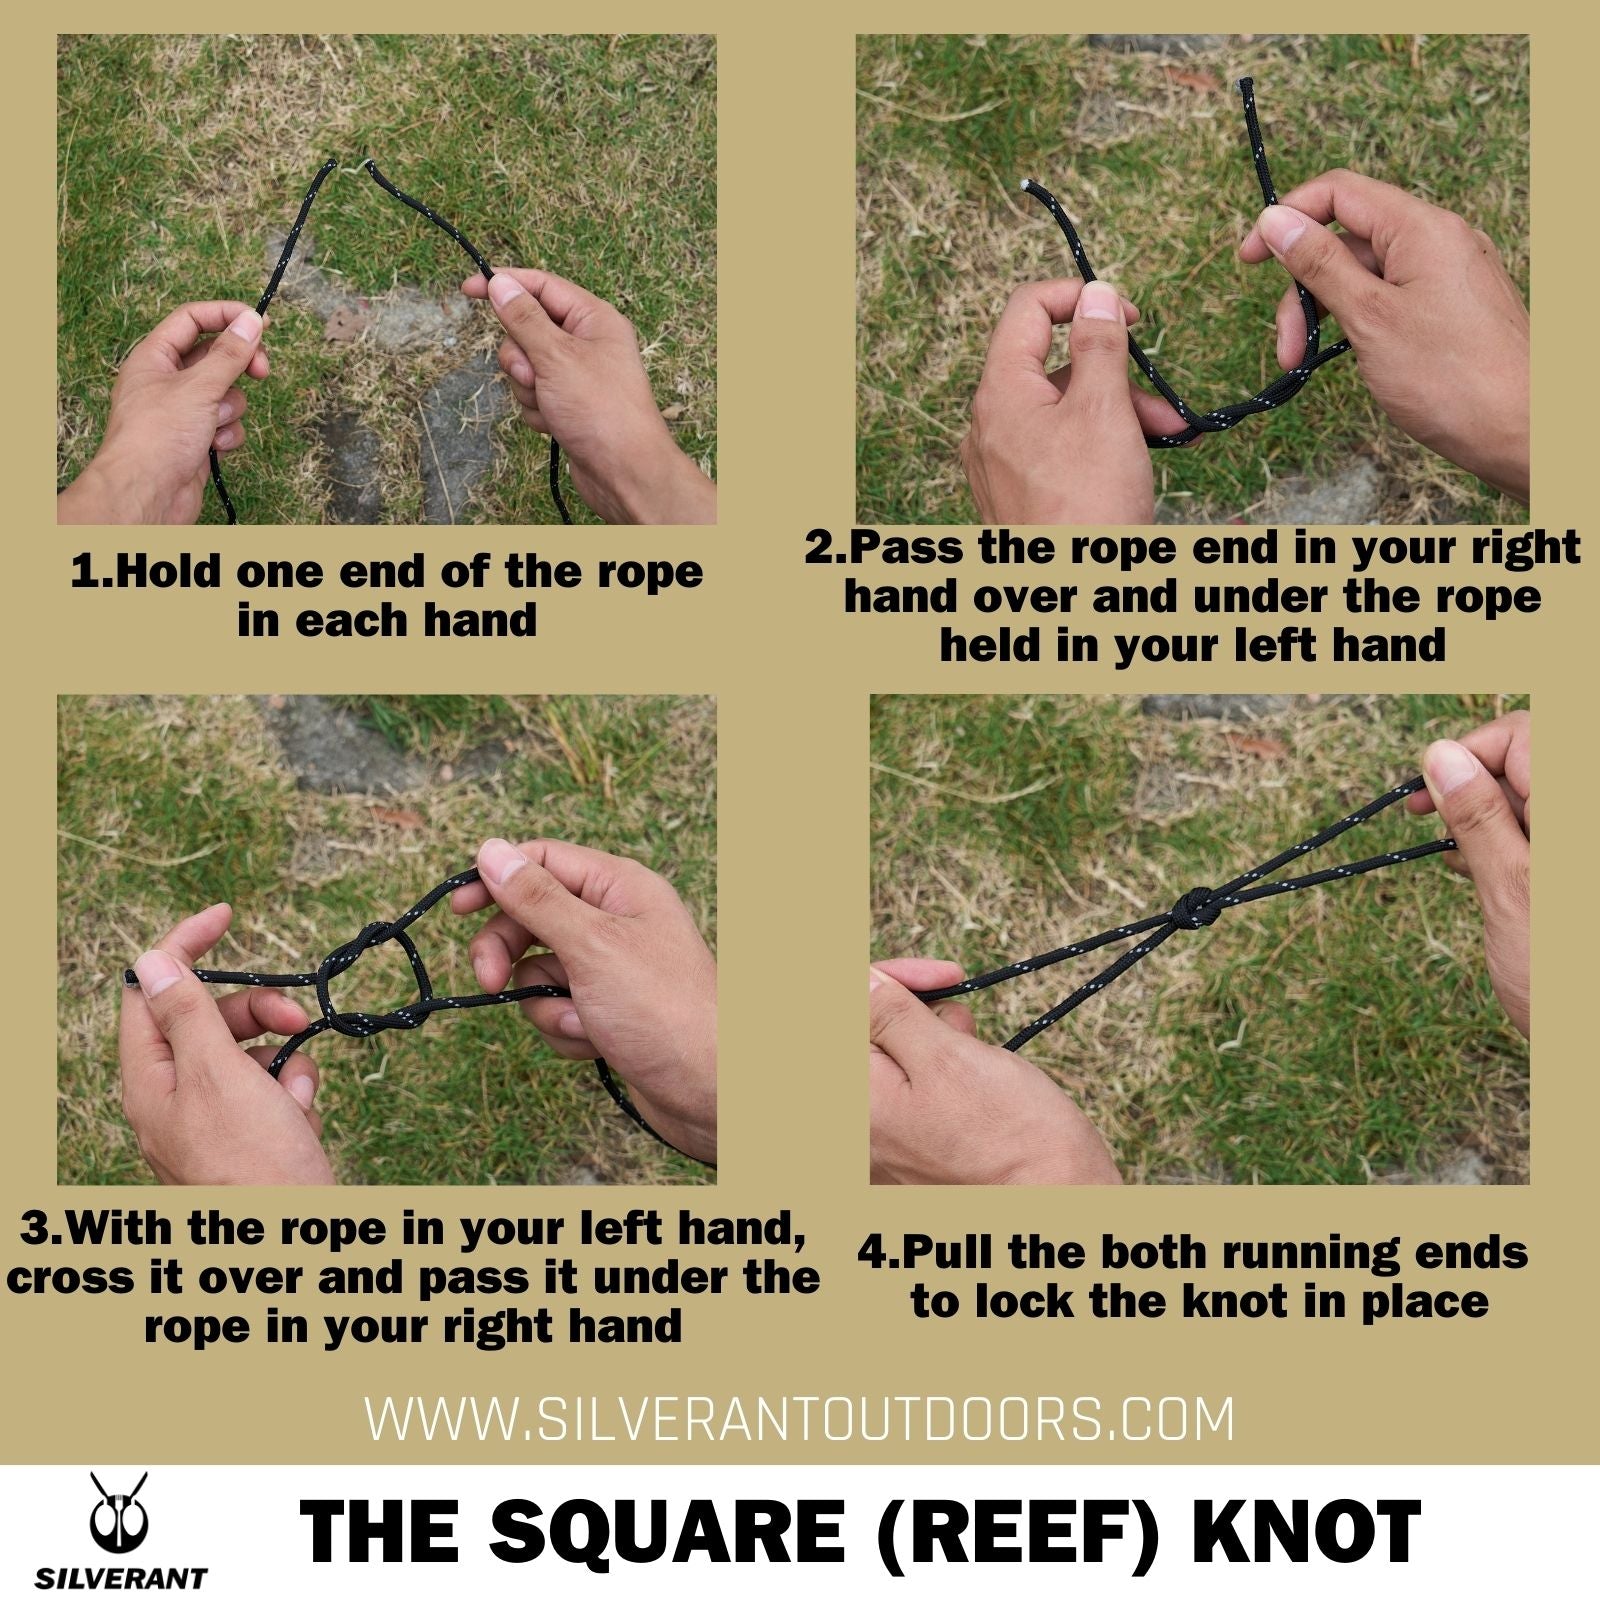
How to Tie the Square Knot
To get started, grasp one end of the rope in each of your hands.
Then, with the end of the rope in your right hand, pass it over and then under the rope held in your left hand.
Now, with the rope in your left hand, cross it over and then pass it under the rope in your right hand.
Lastly, to lock the knot in place, pull both of the rope's running ends simultaneously.
Make certain that the knot lies flat and secure against the objects you're fastening.
Even though there are multiple ways to tie this knot, trust me, after practicing this method three times, you'll get the hang of it, just as I did.
In a nutshell, the Square Knot, thanks to its straightforwardness, adaptability, and reliability, is a crucial addition to the toolkit of any outdoor enthusiast.
Whether you're venturing into the wilderness, bundling parcels, or facing minor emergencies, the Square Knot stands as a versatile and indispensable tool that you should have at your disposal.
Sheet Bend
However, when you have two ropes of different sizes or materials and you need to join them together, the Sheet Bend knot is your solution.
It's a reliable choice because, unlike the Square Knot, it won't slip when dealing with different sizes or materials.
Common Uses
Much like the reef knot, the Sheet Bend connects two shorter ropes into one longer rope, even if they aren't the same size or type.
Also, you don't have to tie the Sheet Bend at the rope ends only.
You can tie it in the middle, which is handy when you want to connect your rope to the middle of another.
For instance, imagine you're tossing a rope over a high tree branch to hang something or set up a pulley system.
Climbing the tree to get your rope back is not an ideal choice.
Instead, you can use a smaller rope as a "rope rescue line." Connect the smaller rope to the larger one using a Sheet Bend.
When you're done with the larger rope, you can rely on the smaller one to retrieve it safely.
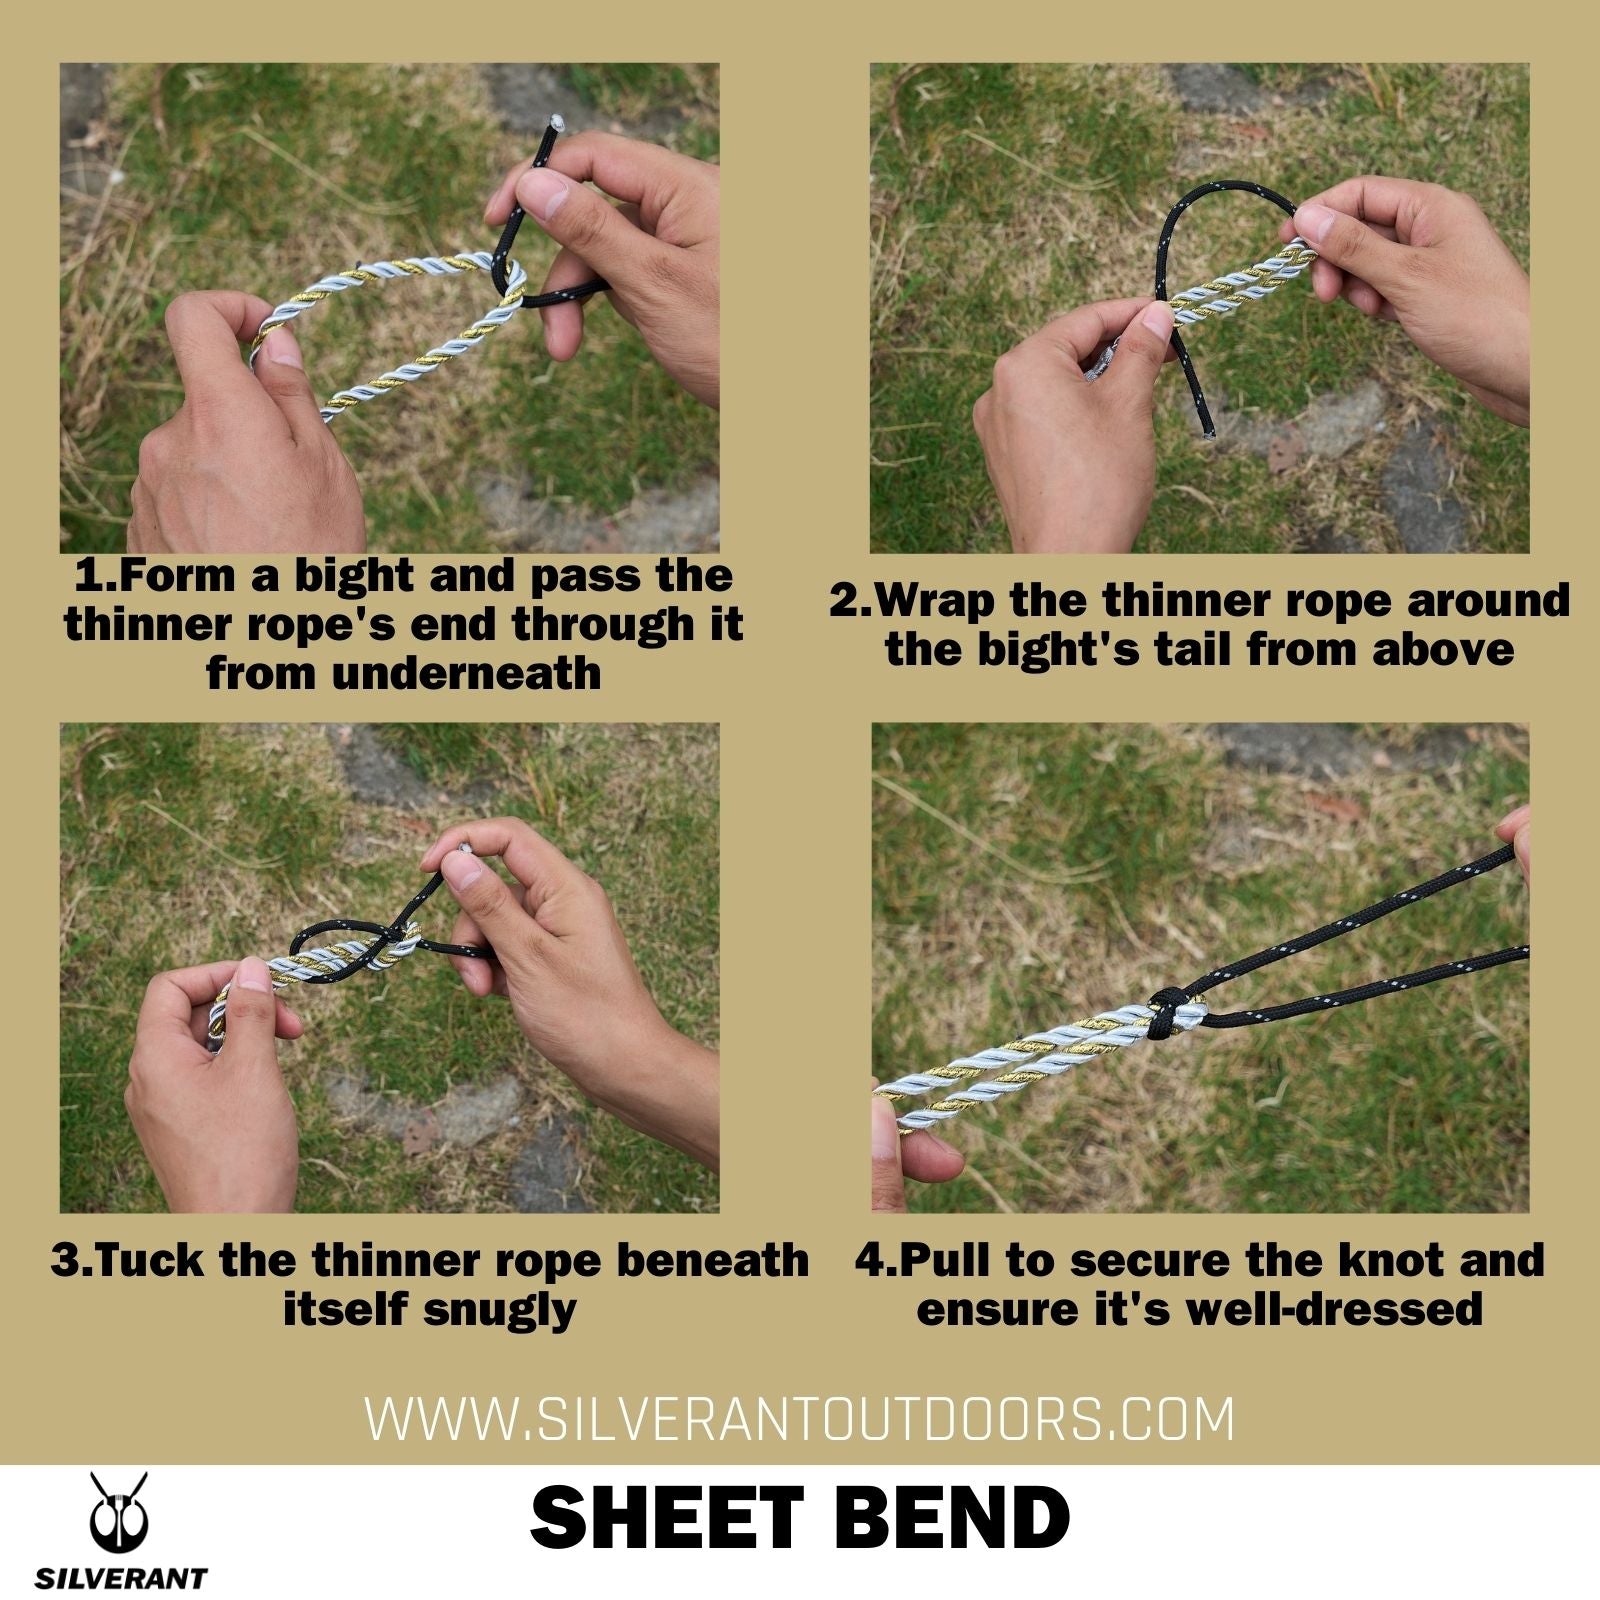
How to make the sheet bend
When it comes to the art of knot-tying, despite its variation from the square knot, it remains a manageable skill with some practice.
You can start by forming a bight, creating a U-shaped loop, in the thicker part of the rope.
Then, pass the end of the thinner rope through this bight, ensuring it goes beneath the bight.
Next, guide the end of the thinner rope around the tail of the bight from the upper side.
With precision, tuck the thinner rope beneath itself, ensuring it's snug but not overly tight.
Finally, give it a confident pull to secure the knot and check to confirm it's well-dressed.
This means making sure your knot isn't loose, and the rope is positioned optimally for the knot to perform effectively.
To sum it up, when you encounter the need to unite two ropes of varying sizes or materials, the Sheet Bend serves as the perfect substitute for the square knot.
Taut-Line Hitch
While the square knot and sheet bend are great for tying secure knots, there are times when you need a knot that can change with the situation.
This is where the Taut-Line Hitch comes into play, offering the best of both worlds: security and adaptability.
What to use it for?
What sets the Taut-Line Hitch apart is how easy it is to adjust. This ability comes in handy in many outdoor situations.
Whether you're pitching a tent, setting up a tarp, or hanging a hammock, there are times when you have to fine-tune the tightness of your lines.
It's not just for land adventures; you can use it to tweak the tension of their sails.
And when the wind unexpectedly picks up, the Taut-Line Hitch shines even brighter.
Making those quick adjustments is as straightforward as sliding the knot back and forth, ensuring your setup stays steady, no matter what the weather has in store.
I remember a winter camping trip with heavy snow and howling winds. My tent was in danger of being blown away.
That's when the Taut-Line Hitch saved the day.
With this knot's flexibility, I could quickly and easily adjust the cord, keeping my camp solid and secure, even in those challenging conditions.
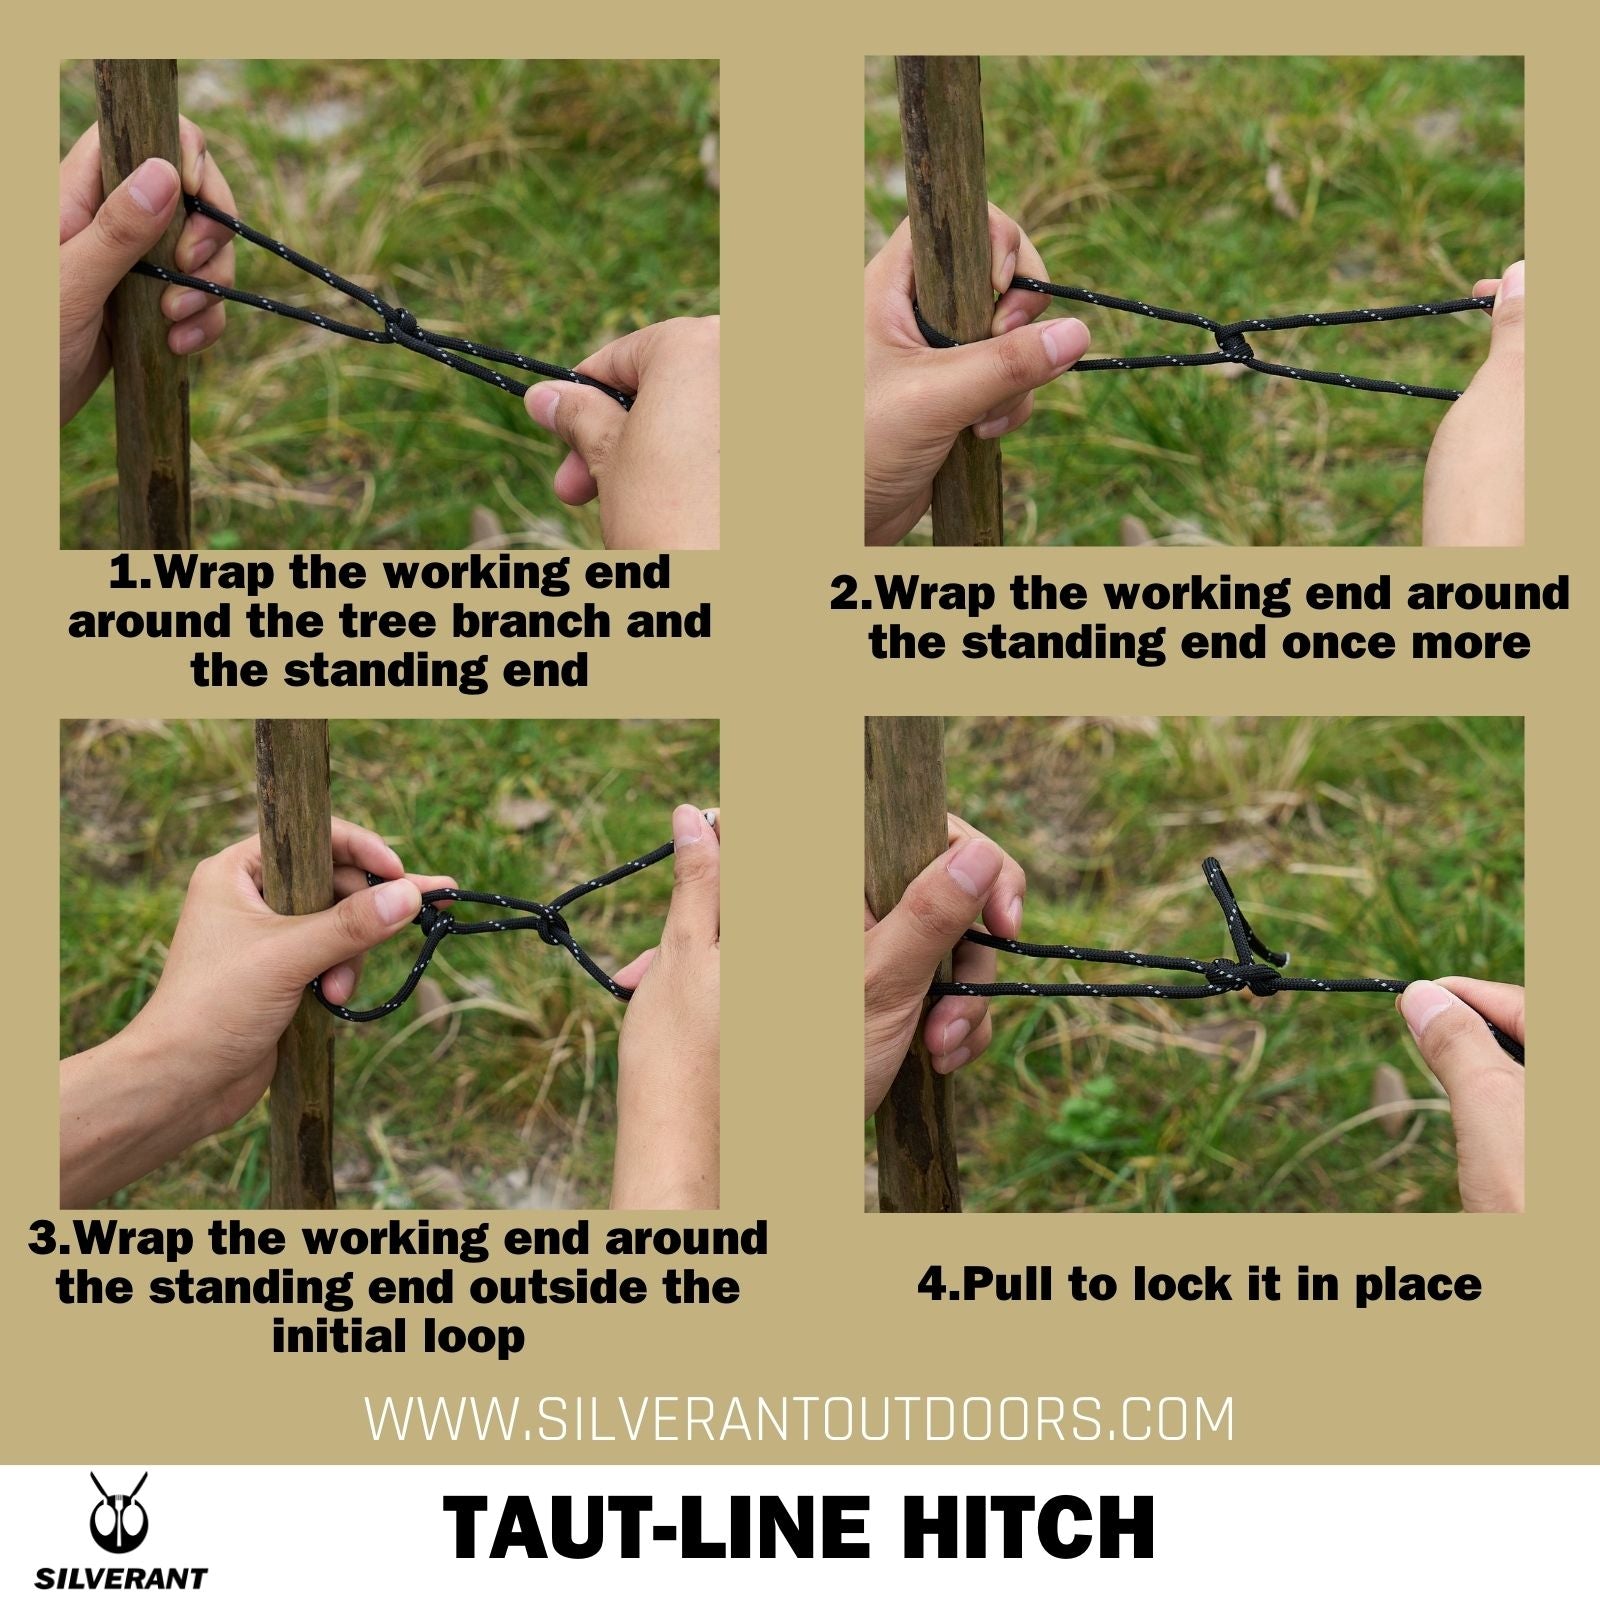
How to make the taut-line hitch?
Mastering the Taut-Line Hitch can be a bit complex, requiring some practice to become proficient.
To begin, take the working end—the active part of the rope—and wrap it around your tent stake or tree branch, and then around the rope’s standing part.
Follow up by wrapping the working end around the standing end once more, placing it beside your initial wrap.
After the wraps, pull the end of the rope upwards, positioning it outside the loop.
Next, complete another wrap by coiling the working end around the standing end, this time outside the original loop.
To lock it in place, hold the standing part with one hand on each side of the support. With your other hand, draw both ends of the rope to tighten the knot.
Finally, you can gently shift the hitch towards your tent stake and secure the line, preserving the desired level of tension.
During my learning process, I stumbled a few times, but the key takeaway is to remember the pattern: two wraps inside and one wrap outside of the original loop.
Once you've got it down, you'll see three snug wraps nicely aligned on the standing part of the rope.
This is where the Taut-Line Hitch really shines, making it a breeze to quickly and easily fine-tune the tension when needed.
Moreover, you can set up this hitch in advance, so it's ready for use whenever you need it.
Take it as the best solution to refining your setups, ensuring they remain steadfast and secure, no matter what challenges the great outdoors may throw at you.
Clove Hitch
The following knot is a true workhorse in outdoor activities, known as the clove hitch.
It's a handy knot often used temporarily, and it becomes extra secure when subjected to loads on both ends.
However, a unique feature is that it can be quickly undone by releasing the load from one end.
Furthermore, it serves as the building block for more complex lashings, like the square and shear lashings discussed in the upcoming sections.
Ideal Applications
First and foremost, for outdoor enthusiasts embarking on treks through bear country, especially in North America, keeping your food out of harm's way is a top priority.
The clove hitch takes center stage in this endeavor, especially when following the PCT (Pacific Crest Trail) method for hanging a bear bag.
Within this technique, the clove hitch plays a pivotal role in crafting a toggle around a sturdy twig.
This toggle allows you to secure a carabiner, which then locks your food bag at the desired height, safely out of reach from the hungry bears.
Additionally, when engaging in bushcraft or wilderness survival, constructing a reliable shelter to shield yourself from the elements is a top priority.
In such scenarios, the clove hitch proves invaluable. It plays a crucial role in the shelter-building process.
Unlike a camp or tarp, a survival shelter demands unwavering stability.
A taut-line hitch, known for its adjustability, may not be the ideal choice.
This is where the clove hitch steps in as the safer and more secure option for anchoring your survival shelter in place.
Crafting the Clove Hitch
To create this knot, follow these steps:
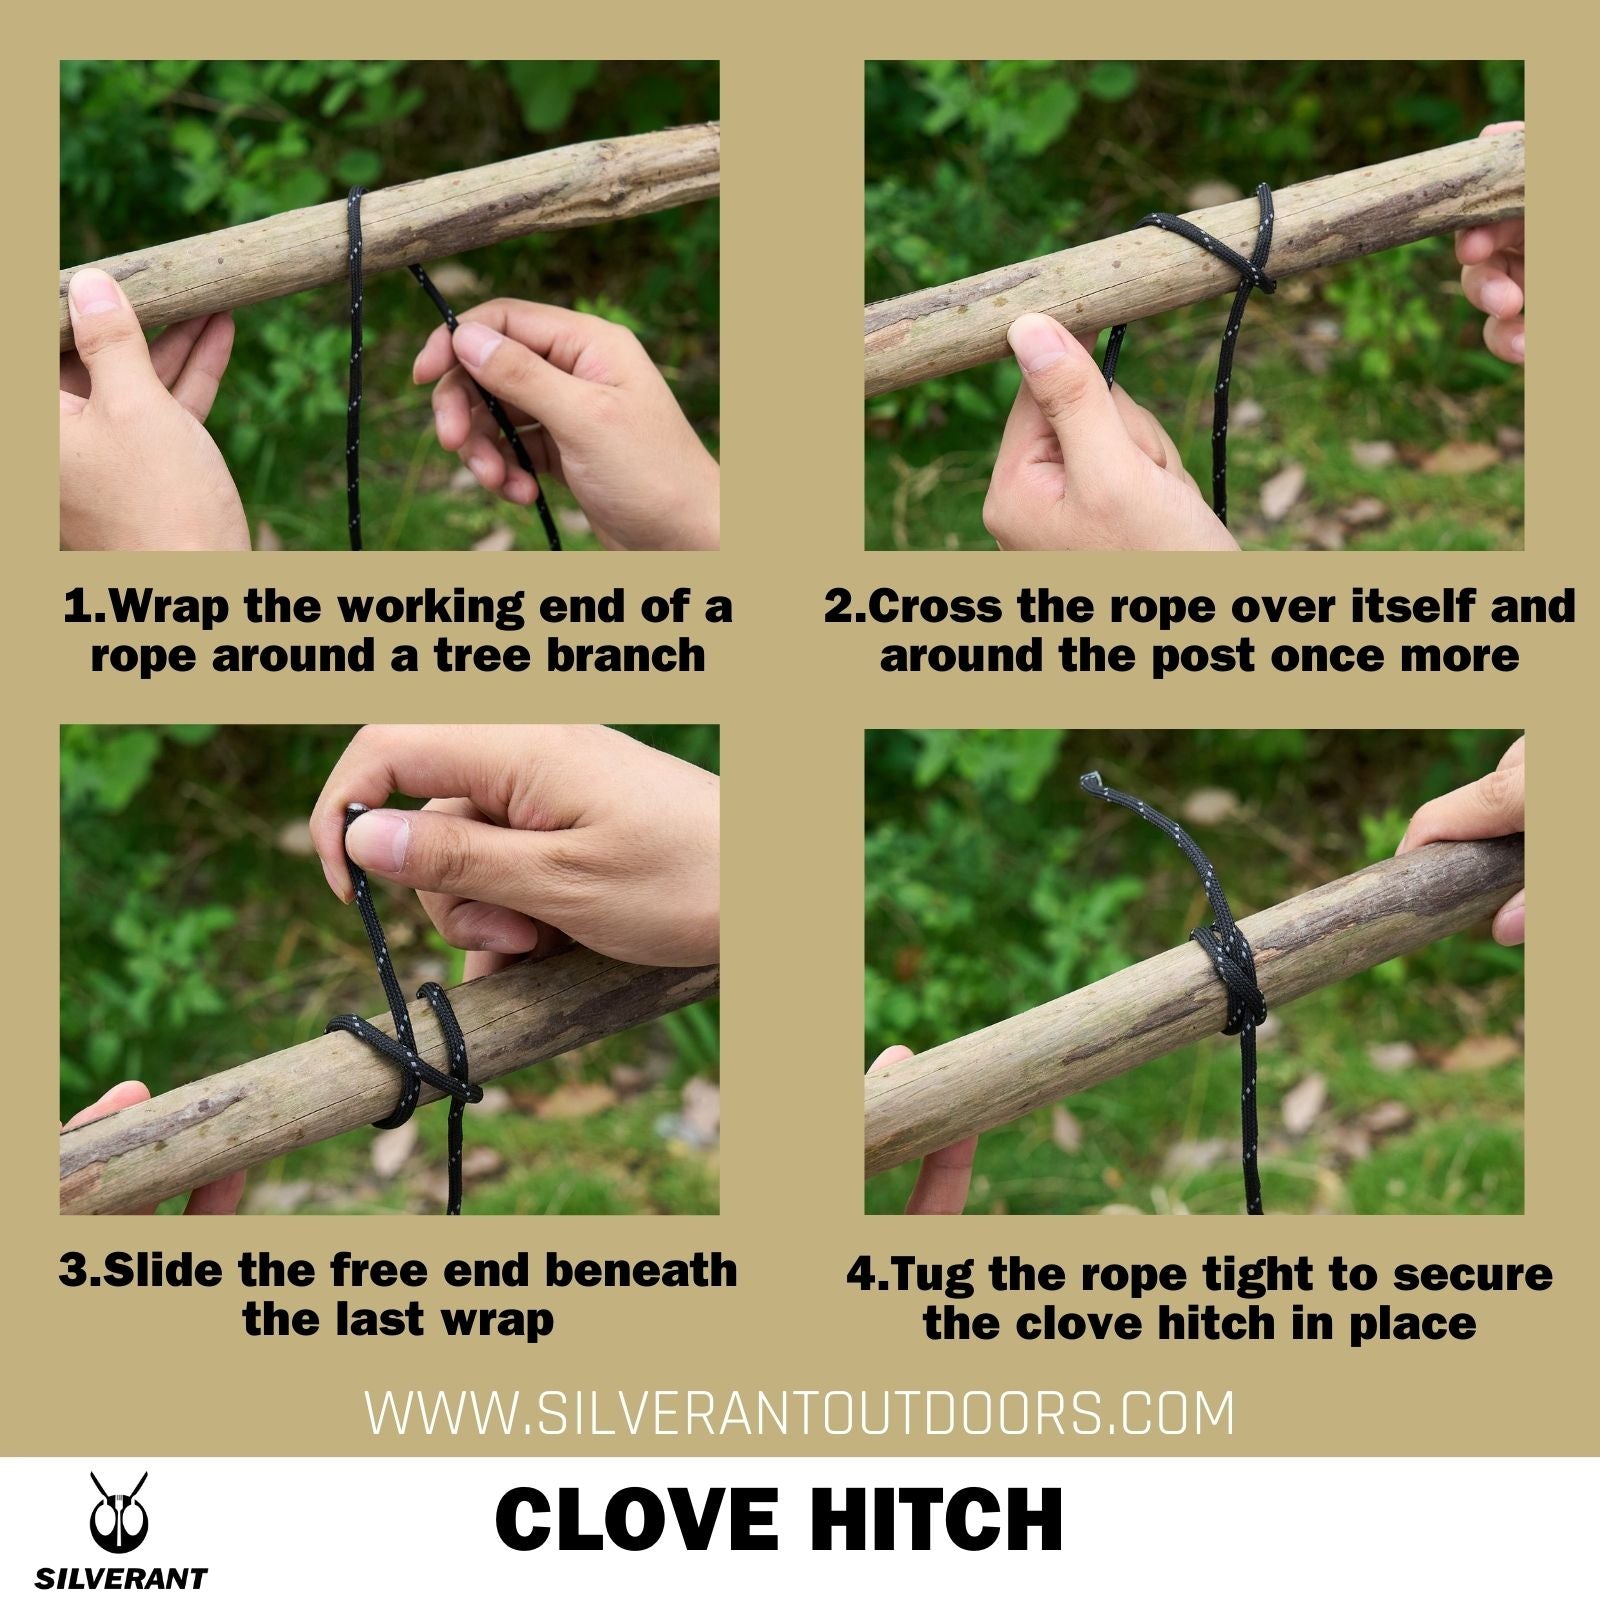
Begin by wrapping the free end of a rope around a tree branch, placing the free end on the right side.
Cross the rope over itself and around the post once more.
Slide the free end beneath the last wrap.
Finally, tug the rope tight to secure the clove hitch in place.
Mastery of this knot is well within reach, and once you've got it down, it opens doors to a whole new realm of possibilities.
Square Lash
Once you've mastered the clove hitch, it's time to delve into the world of the square lash.
This knot excels at joining two sticks or poles at a perfect right angle.
It's remarkably robust and capable of withstanding huge loads.
Common Uses
As this knot has the capability to securely join two sticks or poles at a precise right angle while handling substantial loads, it becomes the optimal selection for crafting the structural framework of your survival shelter.
Once your shelter takes shape, you'll require a sturdy door to protect your haven.
Enter the square lash, playing a pivotal role in crafting a reliable and protective door for your shelter.
However, the square lash isn't limited to shelter construction. It proves to be a versatile tool in unexpected emergency situations.
It can swiftly fashion fences that serve both as warning signals and defensive barriers, ensuring your safety in times of need.
How to make the square lash?
Let's break it down step by step.
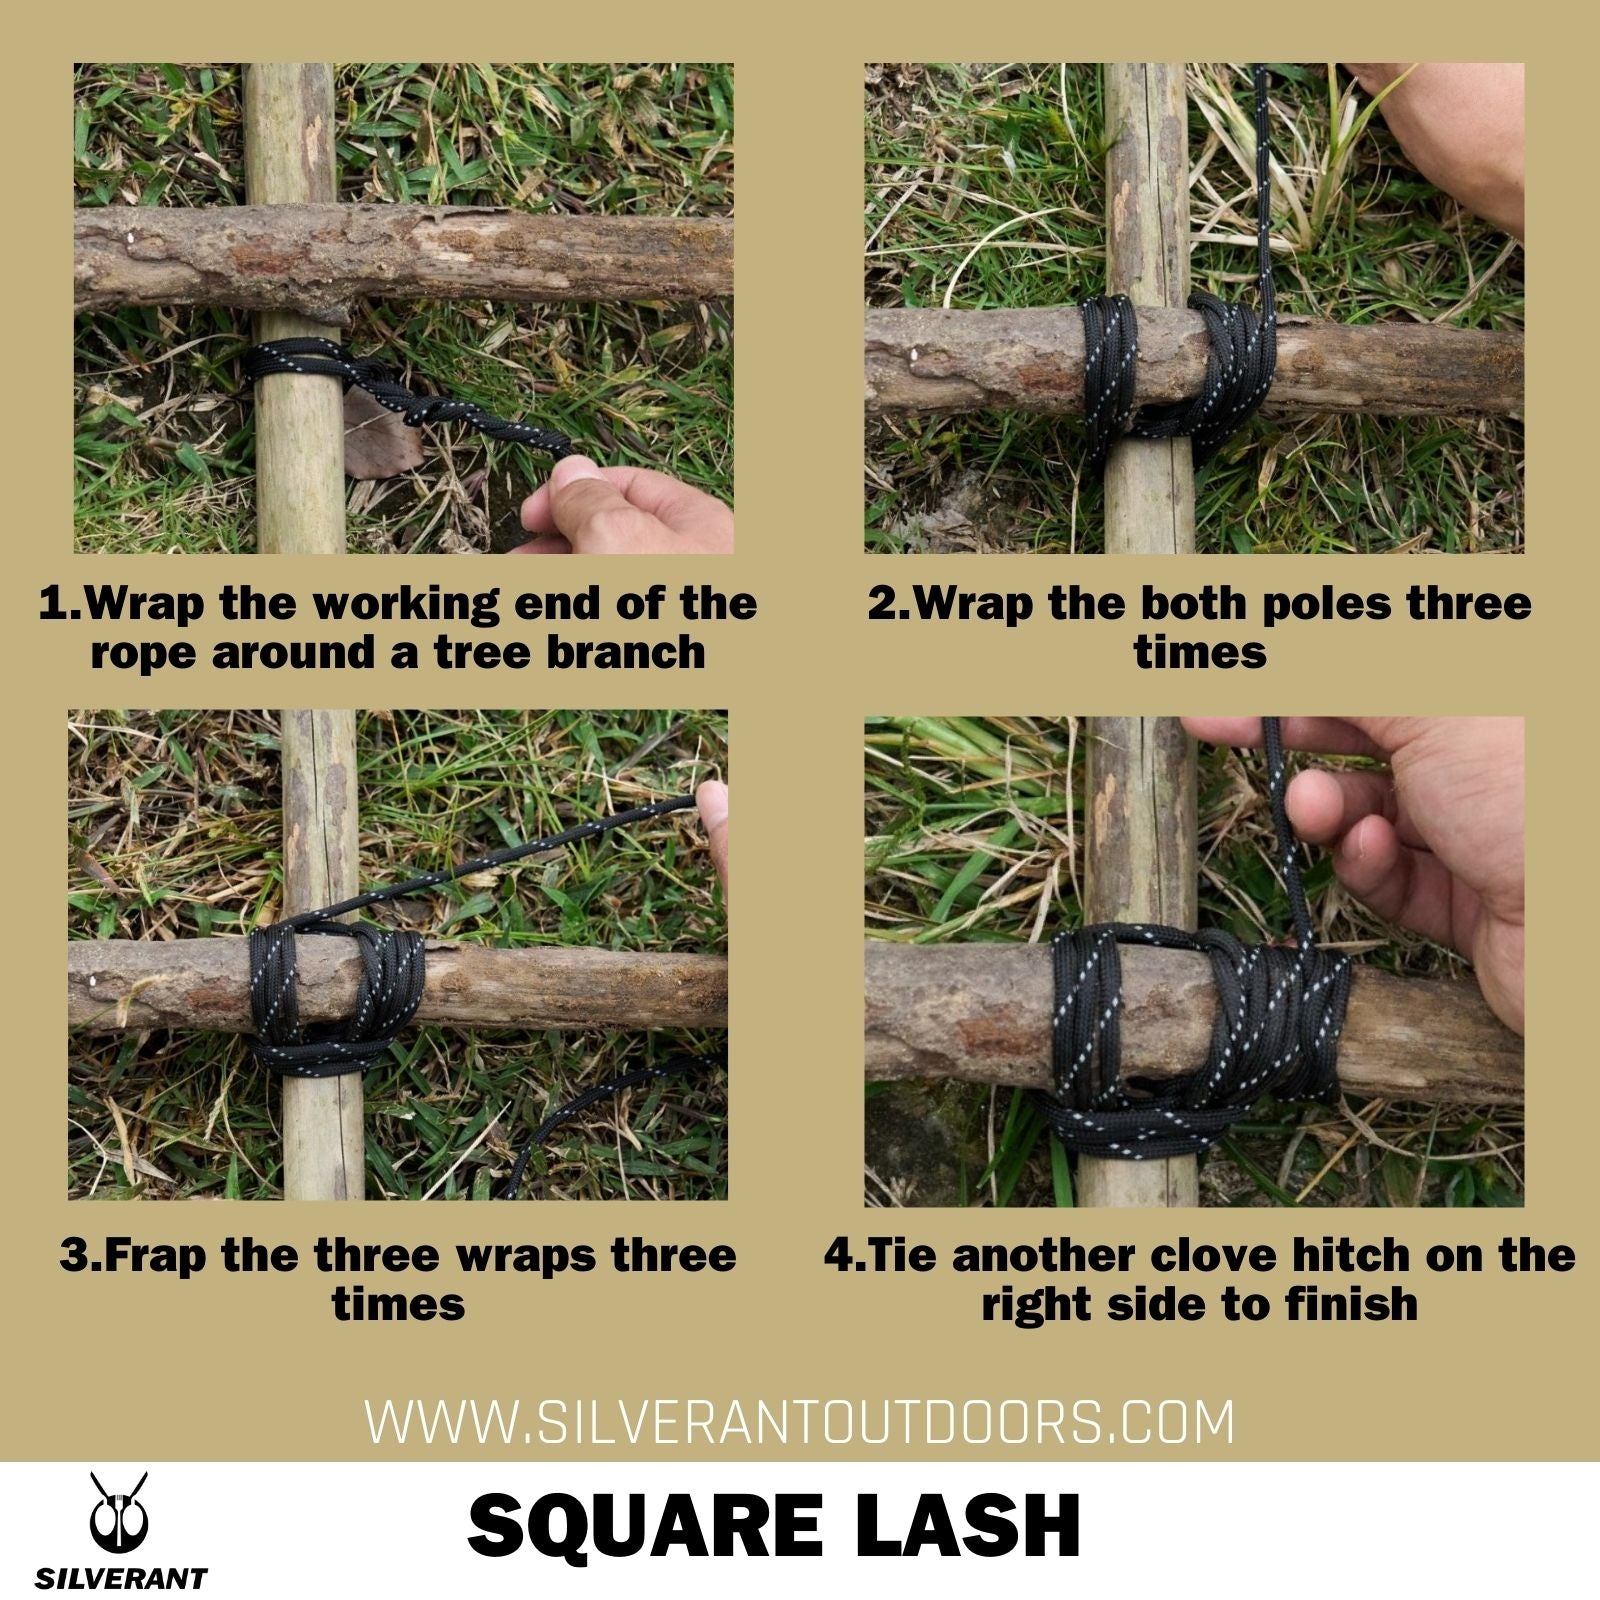
To start, you need to tie a clove hitch at the bottom of the standing pole, then proceed to wind the shorter end around the longer section of the rope.
Following that, begin the first wrap by going around both poles, and repeat this process until you have done it three times.
Move on to the frapping step. Start with the first frapping, making sure to tighten the existing rope wraps, not the poles.
Do a total of three frappings to reinforce the lashings and finish by tying another clove hitch on the right side of the horizontal pole.
In this process, make it a point to continually tweak the alignment of the two poles, ensuring their angle remains at 90 degrees.
The square lash knot, created through this meticulous process, establishes a trustworthy and resilient outdoor knot.
Its versatility makes it suitable for diverse applications, ranging from constructing survival shelters to crafting fences and doors.
Shear Lash
While the square lash is your go-to for connecting two sticks or poles at a precise right angle, the shear lash steps in when you need a different angle.
What to use it for?
One of the most common applications is crafting a cooking tripod, perfect for those times when you're out in nature with friends or family, gathering around a campfire.
There's nothing quite like a cooking tripod for preparing meals, brewing coffee, and steeping tea in the heart of the wilderness, making your outdoor experience all the more authentic.
The Shear Lash excels in this scenario, offering stability and functionality for your cooking needs.
Now, for pot-hanging, some might resort to using a rope, combining a bowline knot with a taut-line hitch.
But, for safety's sake, it's best to avoid this method and opt for a fireproof hanger instead.
Consider the advantages of our titanium pot and pan set, complete with a reliable hanger.
Additionally, thanks to titanium's rapid heating properties, you can enjoy a hearty meal in a few minutes even in cold weather.
How to make the shear lash?
Mastering the shear lash closely mirrors the process of the square lash.
Once you've become proficient with the square lash, you'll discover that the shear lash is just as easy to handle.
To start, ensure you have a rope and three equal-length poles at your disposal.
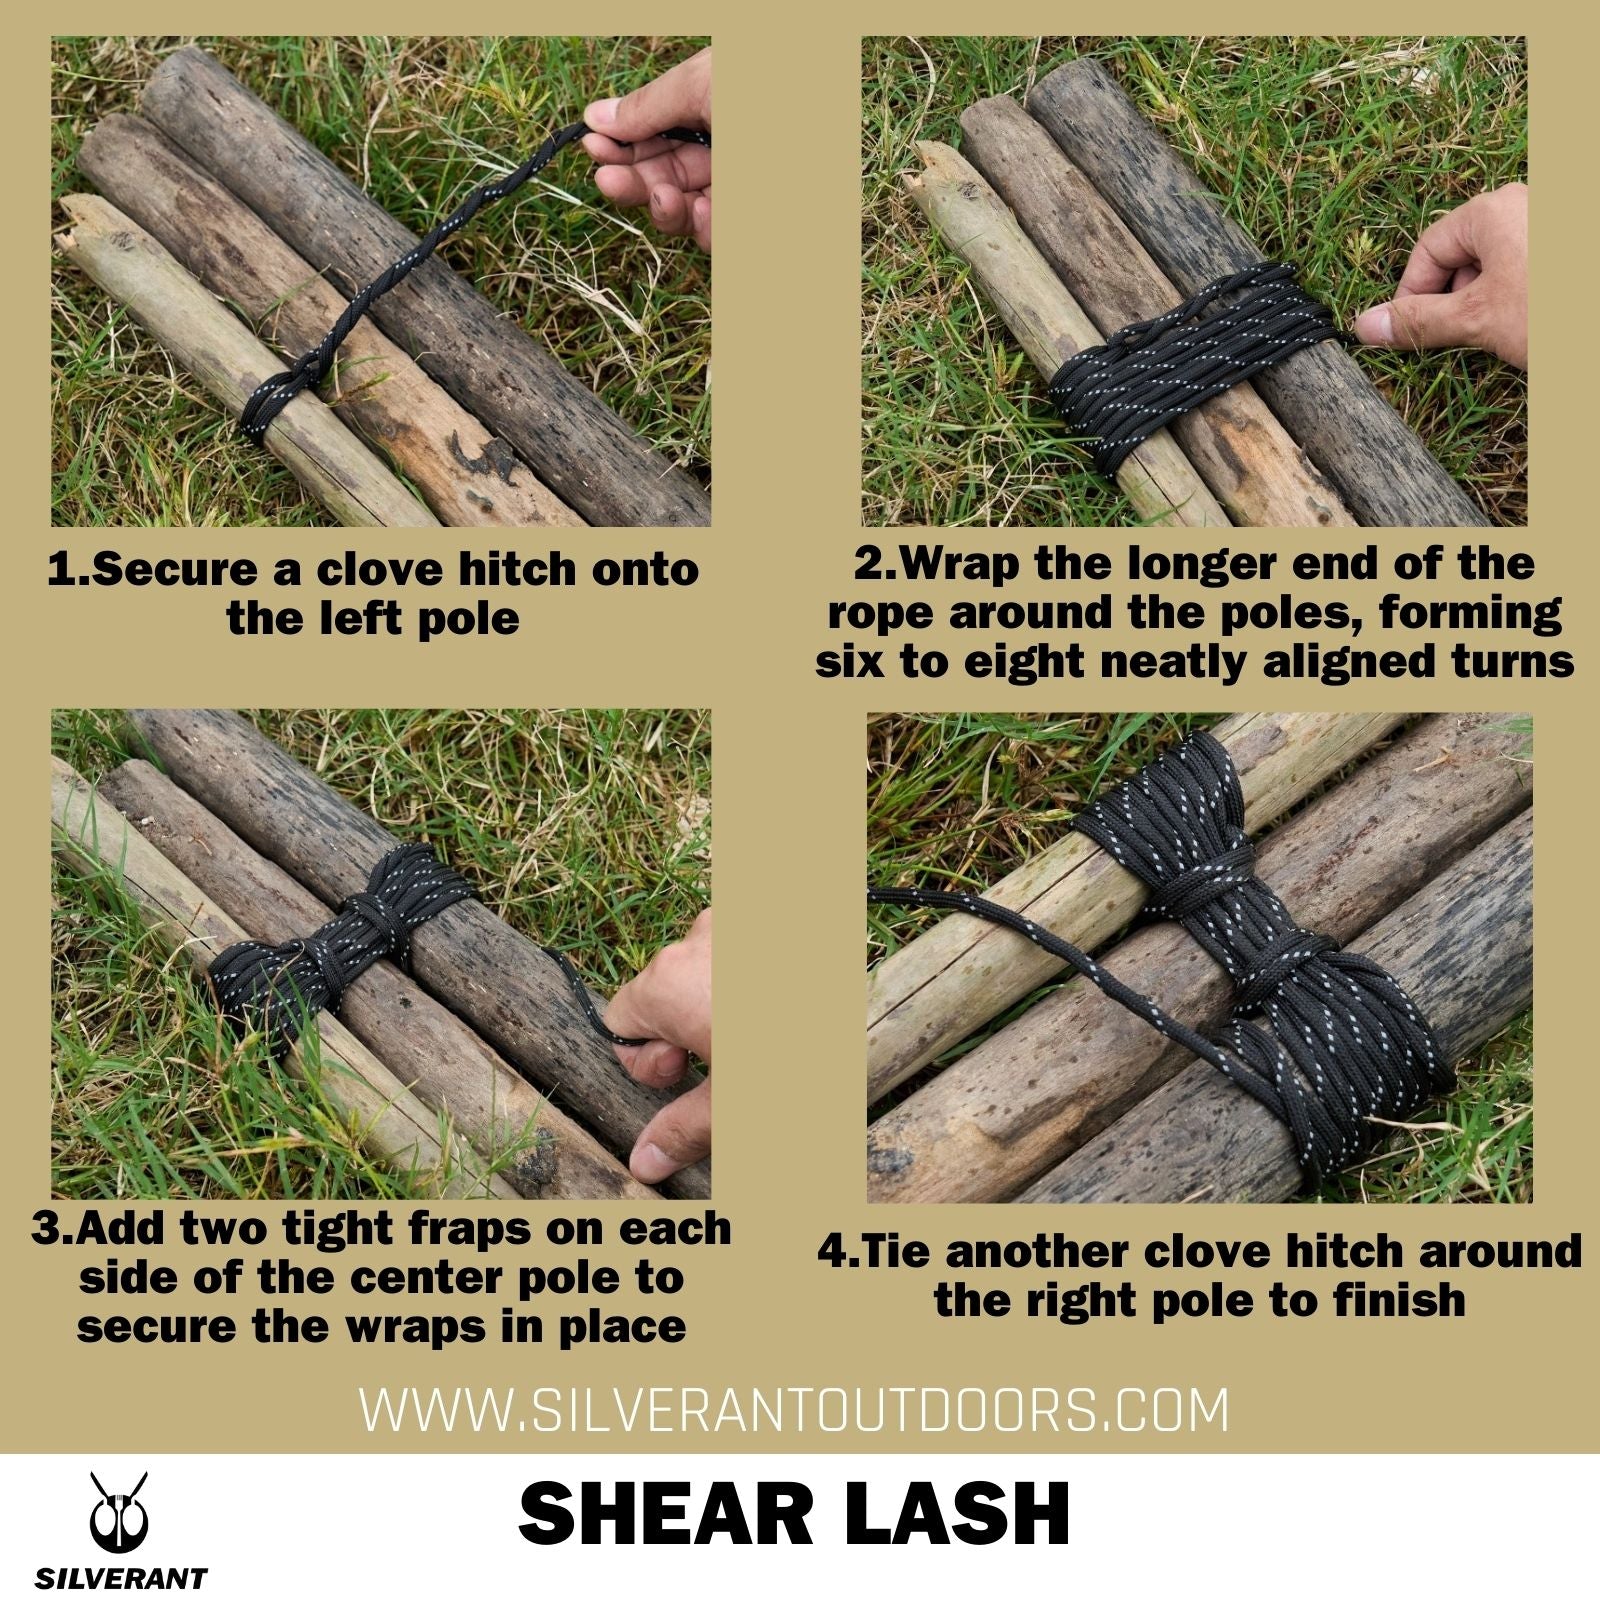
Then line up the three poles side by side, ensuring that the butt ends are evenly matched, and secure a clove hitch onto one of the outer poles.
Next, take the short end of the rope and wrap it around the longer section multiple times, effectively locking the clove hitch in place.
Proceed to wrap the longer end of the rope around the poles, forming six to eight turns, neatly aligned alongside one another.
Add two tight fraps on either side of the center pole to further secure the rope wraps in place.
Finish the lash by tying a clove hitch around one of the outer poles.
Now, you can spread the tripod's legs into position, making sure to cross the outer poles beneath the central one.
However, if you plan to create a small cooking fire between the tripod's legs, remember to position the fire at a safe distance from the tripod's legs.
For those interested in delving deeper into the art of firecraft, we invite you to explore our blog piece, "Firecraft Fundamentals: Starting Fires in Challenging Conditions."
I'm not sure if the previous six knots may have left you feeling a bit perplexed, and if you've decided to stay with me.
But rest assured, the final knot we're about to delve into is quite straightforward to learn, and it holds significant value, particularly in the domains of climbing and sailing.
Bowline Knot
To put it simply, a Bowline Knot is designed to create a secure loop at the end of a rope, and it won't slip or loosen under load.
What's remarkable about it is that it's relatively easy to untie once the load is removed.
Now, let's dive into what you can use the Bowline Knot for.
Frequent Uses
Originally, it earned its name from its frequent use in fastening the bow (front) of a ship to a post or piling.
However, its versatility extends to other domains.
For outdoor enthusiasts, especially in rock climbing, the Bowline Knot is invaluable.
It's a trustworthy knot when you need to secure a rope to a tree or another natural anchor.
How to make the bowline knot?
Creating a Bowline Knot becomes a breeze once you've mastered the six knots we covered earlier.
Here are the steps for tying a Bowline Knot:
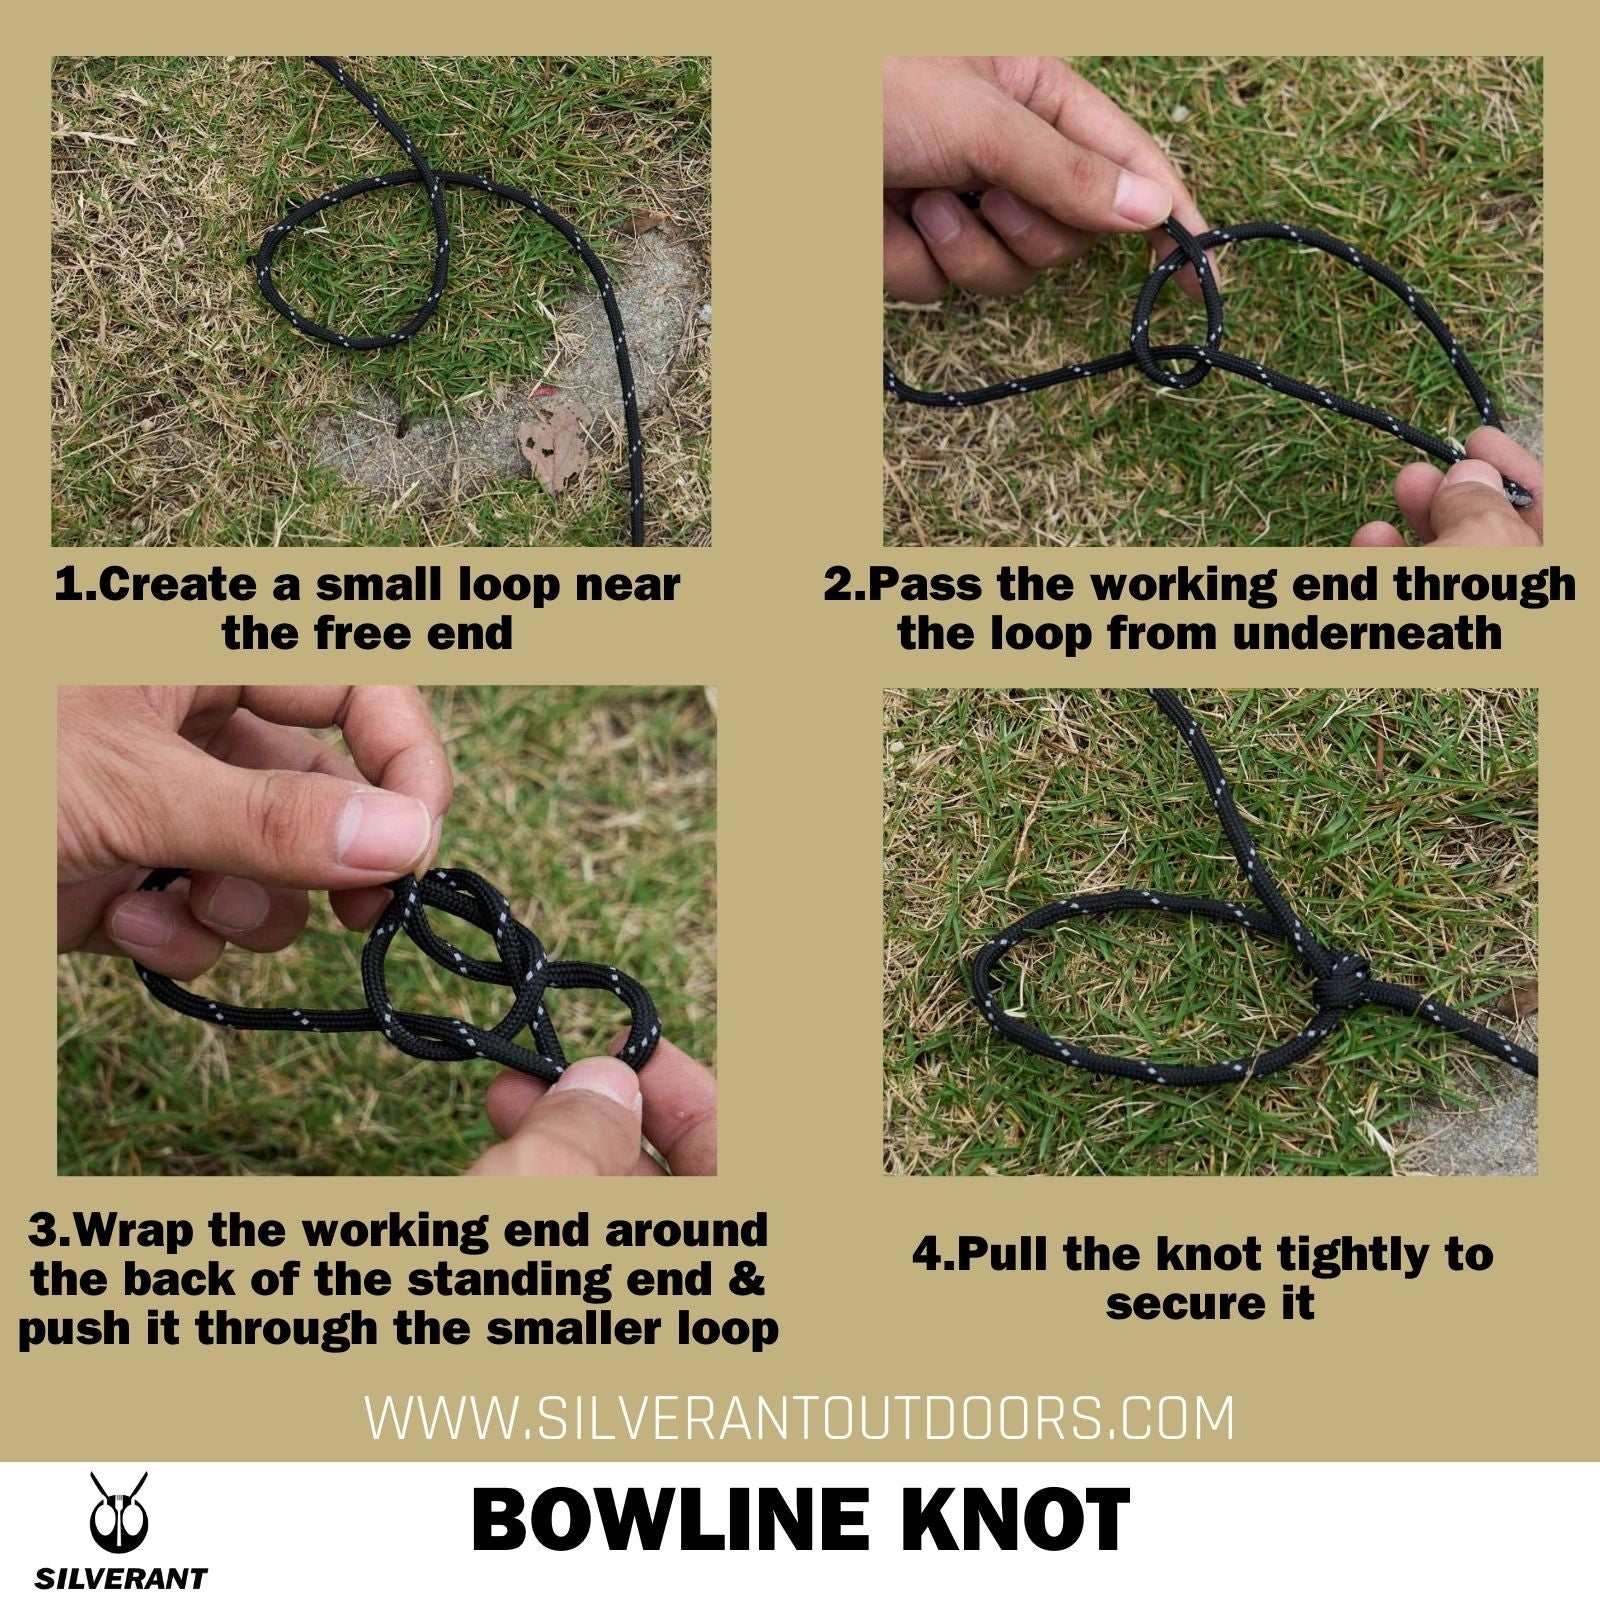
Start by laying the rope in front of you and creating a small loop near the free end.
Take the free end and pass it through the loop from underneath.
Now you'll have two loops: the original smaller loop and a second, larger loop you just formed.
Then wrap the free end around the back of the standing line.
Push the free end back down through the original, smaller loop.
Finally, pull the knot tightly to secure it, and you're good to go!
In conclusion, whether you're a climber or sailor, the Bowline Knot is a handy skill to have in your toolkit.
Conclusion
In conclusion, gaining expertise in these essential knots is a valuable skill for people who enjoy outdoor activities, including campers, hikers, rock climbers, sailors, and more.
The square knot is especially useful for connecting shorter cords of the same size, making your cord longer.
On the other hand, the sheet bend is great for joining cords of different sizes.
When it's time to adjust the tension of your lines while setting up your camp, tarp, or hammock, the taut-line hitch is incredibly helpful.
The clove hitch, mainly a temporary knot, is handy for hanging bear bags and securing survival shelters.
It also lays the groundwork for more advanced lashings.
For situations where you need a right-angle connection, the square lash comes in handy.
It creates a strong and reliable knot that's perfect for building survival shelter frames, fences, and doors.
Conversely, the shear lash is great for non-right angle connections, making it a versatile knot for crafting cooking tripods.
It enhances your camping experience by providing a sturdy setup for meal preparation.
The bowline knot is a dependable choice as it forms a secure loop at the end of a rope that doesn't slip.
Its quick-release feature and practical uses in sailing and climbing make it a valuable addition to your knot-tying skills.
While these knots may seem complex at first, becoming proficient in them requires practice and revisiting.
Don't hesitate to save this guide for future reference, as mastering these knots will prove beneficial on various outdoor adventures.
To your next adventure
Steve