


20% off our most popular bundle
Was $109.99 Now $87.99

Introduction
In our earlier blogs, we shared basic knots for connecting short lines, creating shelters, cooking outdoors, and managing outdoor first aid.
We also explored creative uses of knots for things like zipper pulls, tool handles, and bushcraft furniture.
If you haven't read those yet, take a moment to catch up and build a foundation in knot knowledge, especially the clove hitch.
It'll make understanding today's tips even easier.
But here's the deal - the knots we've covered so far won't cover all your outdoor needs.
Let me share a story: our ambassador, the ReWilders Team, during their first journey in Africa, faced a river without a raft.
Despite having trees around, they were stuck without the right skills for lashing and binding.
So, in this article, we'll dive into lashings and bindings to level up your outdoor adventures.
Lashings
Before we jump into today's lashing technique, let's quickly go over the basics of lashing.
When people generally mention 'knots,' they usually refer to tying ropes together or securing them to objects like trees.
However, it's crucial to understand that there are various types of knots.
When you unite the two ends of ropes, that's what we commonly call a 'knot.'
On the other hand, when you use a rope to bind two or more spars or poles together, that's when you're dealing with a 'lashing.'
So, when we're discussing lashing, we're talking about the ropework specifically used to secure spars or poles together.
Round Lashing
In our earlier blog piece, we covered the square lashing, which is perfect for building a robust shelter frame using long logs.
But, what if you've got shorter poles on hand? That's where round lashing steps in.
Round lashing is your go-to when you need to join those shorter poles, creating a longer and super sturdy length.
Usually, you'd employ two round lashings to securely anchor those two poles together.
And here's a little trick for an added layer of security – slip in two wedges between the poles.
One sits snugly above the upper lashing, and the other finds its spot below the lower lashing.
That's the secret sauce for making your lashing ultra tight.
Now, let's get down to business and learn how to tie a Round Lashing.
It's a breeze, just two clove hitches and a handful of wraps.
Start by throwing a clove hitch around those poles.
Next, wrap the rope snugly around both poles about 8-10 times.
I tend to lean towards 10 times for an added safety dance.
Finish off your lashing with another clove hitch, and you're good to go!

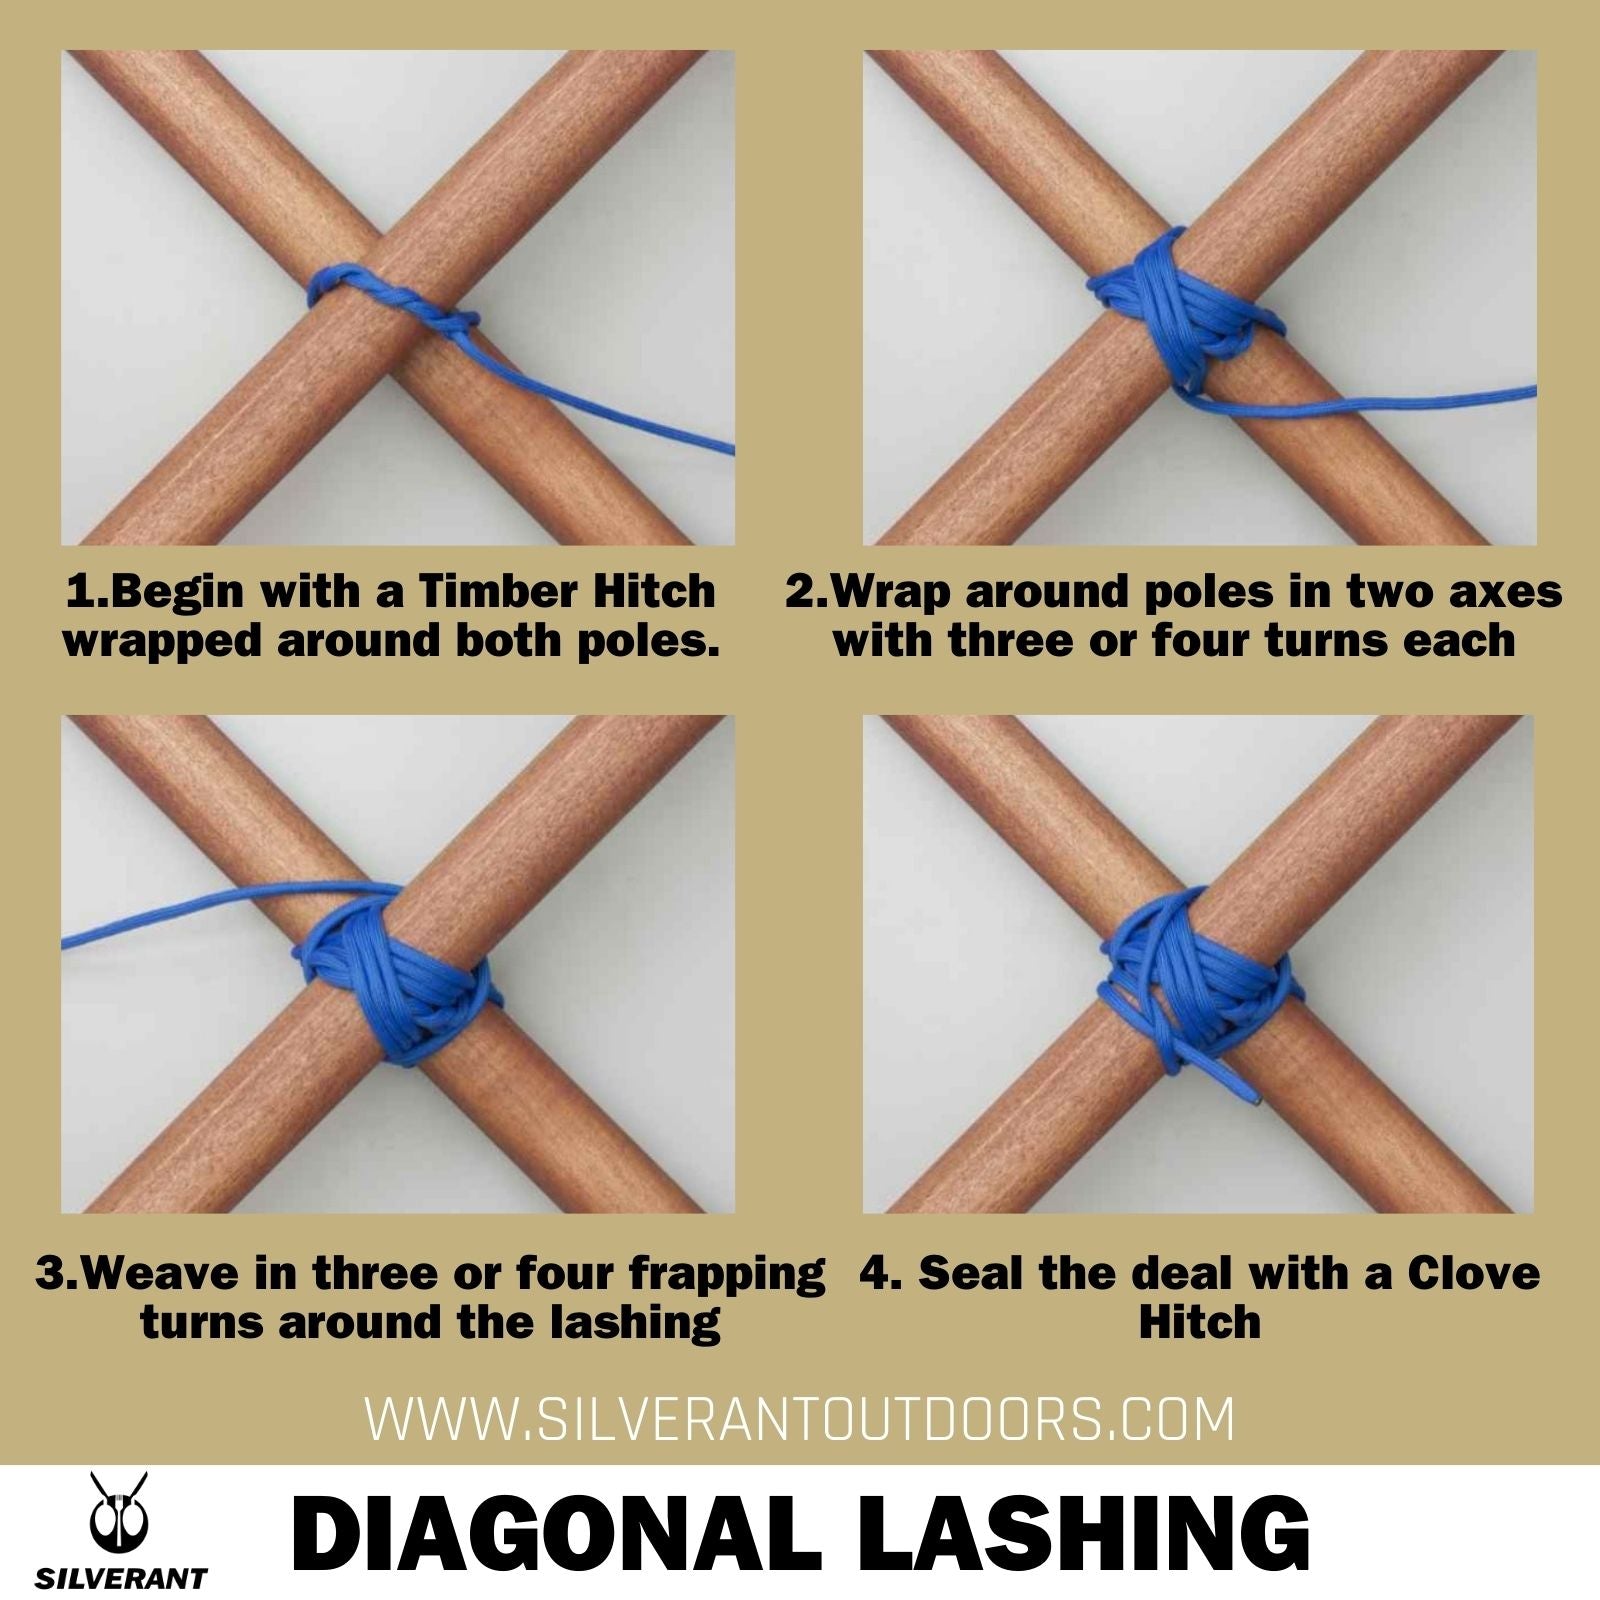
Diagonal Lashing
While the square lashing excels at securing poles at right angles, the diagonal lashing steps up when you've got poles crossing each other at varying angles, specifically between 45° and 90°.
The beauty of the diagonal lashing lies in its ability to join two diagonal poles, adding stability to a rectangular frame by incorporating triangular elements.
Remember the geometry lesson from school? Rectangles tend to change shape under pressure, but triangles hold their ground.
So, where does the diagonal lashing shine? Think shelter frameworks, shelter doors, and yes, even outdoor furniture.
In my own outdoor adventures, I rely on it heavily, especially when crafting robust bushcraft chairs.
It guarantees me a sturdy seat for sipping a cup of cozy coffee by the campfire.
Here's how to make a solid diagonal lashing:
Begin with a Timber Hitch wrapped around both poles.
For those not familiar, a Timber Hitch involves wrapping the working end of the rope around the pole and then looping it around the standing end.
Make sure to wind the end around itself three times and cinch the knot tight, ensuring those three turns grip snugly against the pole.
Next up, make three or four turns around the two poles on one axis.
Then, follow up with three or four turns on the other axis.
To add that extra layer of tightness, weave in three or four frapping turns around the lashing.
And to wrap things up securely, seal the deal with a Clove Hitch.
This method is pure magic for forging a robust connection between diagonal poles, guaranteeing that your structures remain steadfast and dependable.
Floor Lashing
Now, let's talk about the floor lashing, and hey, do you still remember our pals, The ReWilders Team?
Turns out, when faced with a river and in need of a raft, this is the skill they've been missing.
But here's the twist—beyond just crafting rafts, the floor lashing comes in handy for creating various flat surfaces.
Picture this: tabletops, floors, or even a makeshift bridge walkway.
However, this lashing is a bit more intricate because it involves managing and wrapping quite a few spars.
It's a two-part process involving decking and stringer spars.
Decking spars make up the flat surface, resting on top of two stringer spars that not only provide support but also help maintain the floor's shape.
Two stringer spars are placed at a 90° angle to the decking spars at each end.
Here's a breakdown of how to execute a floor lashing:
To make a floor lashing, begin by laying the poles side by side on top of the stringers.
Secure a clove hitch around each stringer to anchor the starting point.
Next, lock the short end of the rope by twisting it around the length of the remaining rope.
Now, create a bend (or bight) in the rope and pass the entire bend over the first decking spar on the inside of the stringer.
Reach underneath the stringer to grab the bend and loop it over the end of the first decking spar on the outside of the stringer.
Ensure a tight loop against both the decking spar and the stringer.
Proceed by feeding the working end of the rope back under the stringer and then up on the inside of the second decking spar.
Repeat this process of creating a bend and passing it over the decking spars until all the poles are securely bound to the stringer.
As you approach the end, secure the rope against the stringer with a clove hitch to complete the floor lashing.
This method ensures a sturdy and reliable binding of the poles, creating a stable and well-connected floor structure.
Now, let's add a touch of wisdom with some advanced tips, straight from our hands-on experience:
First, when you're placing those decking poles on the stringers, go for a setup where their butt ends take turns in alternating directions.
This savvy choice works wonders, offsetting the natural taper of the poles and ensuring a flat, well-balanced platform.
Second, kick it up a notch by lashing the decking spars to the stringers at the same time.
This not only streamlines the process but also ensures you end up with an even firmer and more secure surface.
And, just in case you want a visual guide because, let's be honest, the floor lashing can be a bit more complex, feel free to check out this YouTube video on floor lashing.
In a nutshell: round lashing extends short poles, diagonal lashing stabilizes rectangular frames with triangles, and floor lashing works for rafts, tabletops, floors, and even makeshift bridges.
With the square and shear lashing skills you picked up earlier, you're armed to create a dream campsite.
Imagine sturdy shelters, cozy tables and chairs, a nice firewood shed, and practical drying racks – all crafted by your own hands. Your outdoor haven, perfectly tailored.
Binding Knots
Moving beyond lashings used to secure larger elements like spars or poles, we still need binding knots for the smaller details that make your adventures truly perfect.
Miller's knot
Starting with the trusty Miller's knot. This knot is your go-to for securing the neck of a sack or bundling up a roll.
The beauty of it? It's a breeze to tie and untie.
Now, picture yourself out there in the wild, gathering your food on a bushcraft adventure.
Miller's knot steps in to secure your bag, making sure everything stays put while you navigate the great outdoors.
And hey, when it comes to sorting out your camping gear, why not bring in the Miller's knot magic?
Use it to bind together your rolled-up sleeping bags, tarps, or any other camping essentials. It adds that touch of practicality to your outdoor organization.
Lastly, imagine you're on the road, and, oh no, a torn bag threatens to throw a wrench in your plans.
Fear not! Miller's knot comes to the rescue as a quick and effective binding solution.
No need to halt your journey; this knot ensures you can keep going with minimal disruptions.
Here's how you tie it:
First, pass the rope’s working end over and around the neck of the sack, then over the first turn.
Continue the wrap around a second time, right beside the first turn.
Finally, tuck the end under the first turn to complete the Miller's knot.
Easy peasy, right? That's the beauty of it – simple yet incredibly practical in various scenarios.

Boa knot
Next, let me introduce you to the Boa Knot – a slick, modern binding knot brought to life by the crafty weaver, Peter Collingwood, back in 1996.
His grand plan? Cook up a knot that stands its ground even when the thing it's grabbing onto gets snipped close to the wraps.
The result? The Boa Knot – a knot that won't budge, especially on those smooth cylindrical things.
Let's kick it off – the Boa Knot is your go-to move for staking down tents and keeping those guylines in check.
When the wind decides to throw a tantrum, this knot steps up, holds tight, and keeps your outdoor sanctuary grounded.
Back in the day, tent stakes were all about that round life, and guylines fancied a bit of mischief in the wind.
Enter the Boa Knot – the hero that kept everything in place, no matter how much nature tried to stir things up.
Now, if you've stepped up to our durable Y-shaped stakes, boasting teeth on each of their three sides, you're pretty much carefree. No need to fret about guyline gymnastics on these stakes.
But, if you're anything like me and love soaking in those camping lantern vibes, the Boa Knot is your golden ticket.
It ties down your lantern like a champ, even when the wind decides to join the party.
And to all you fishing fanatics out there – the Boa Knot's got your back too.
When it's time to lock in your fishing line to hooks, lures, or swivels, this knot steps onto the scene.
It laughs in the face of a spirited fish tugging away, making sure that connection stays unshakable.
Here's how you whip up this knot magic:
So, to conjure up this knot magic, start things off by creating a loop, circling around in a counter-clockwise rhythm.
Next up, throw in another loop, just layering it over the first one like you're laying down a casual challenge.
Now, give those loops a twist, turning the right side in a clockwise sway. It's kind of like a knot dance move, and there you have it – a snazzy figure-eight.
Now, grab a cylindrical object and slide it slyly from under and above through the first and the other loops.
Gently pull the loose ends away, shaping the knot with care. Make sure those strands behave and stay aligned, no slipping allowed.
Lastly, tighten those loops until they cozy up to the desired object.
Ta-da! You've just mastered the art of the Boa Knot. Knot magic, complete!

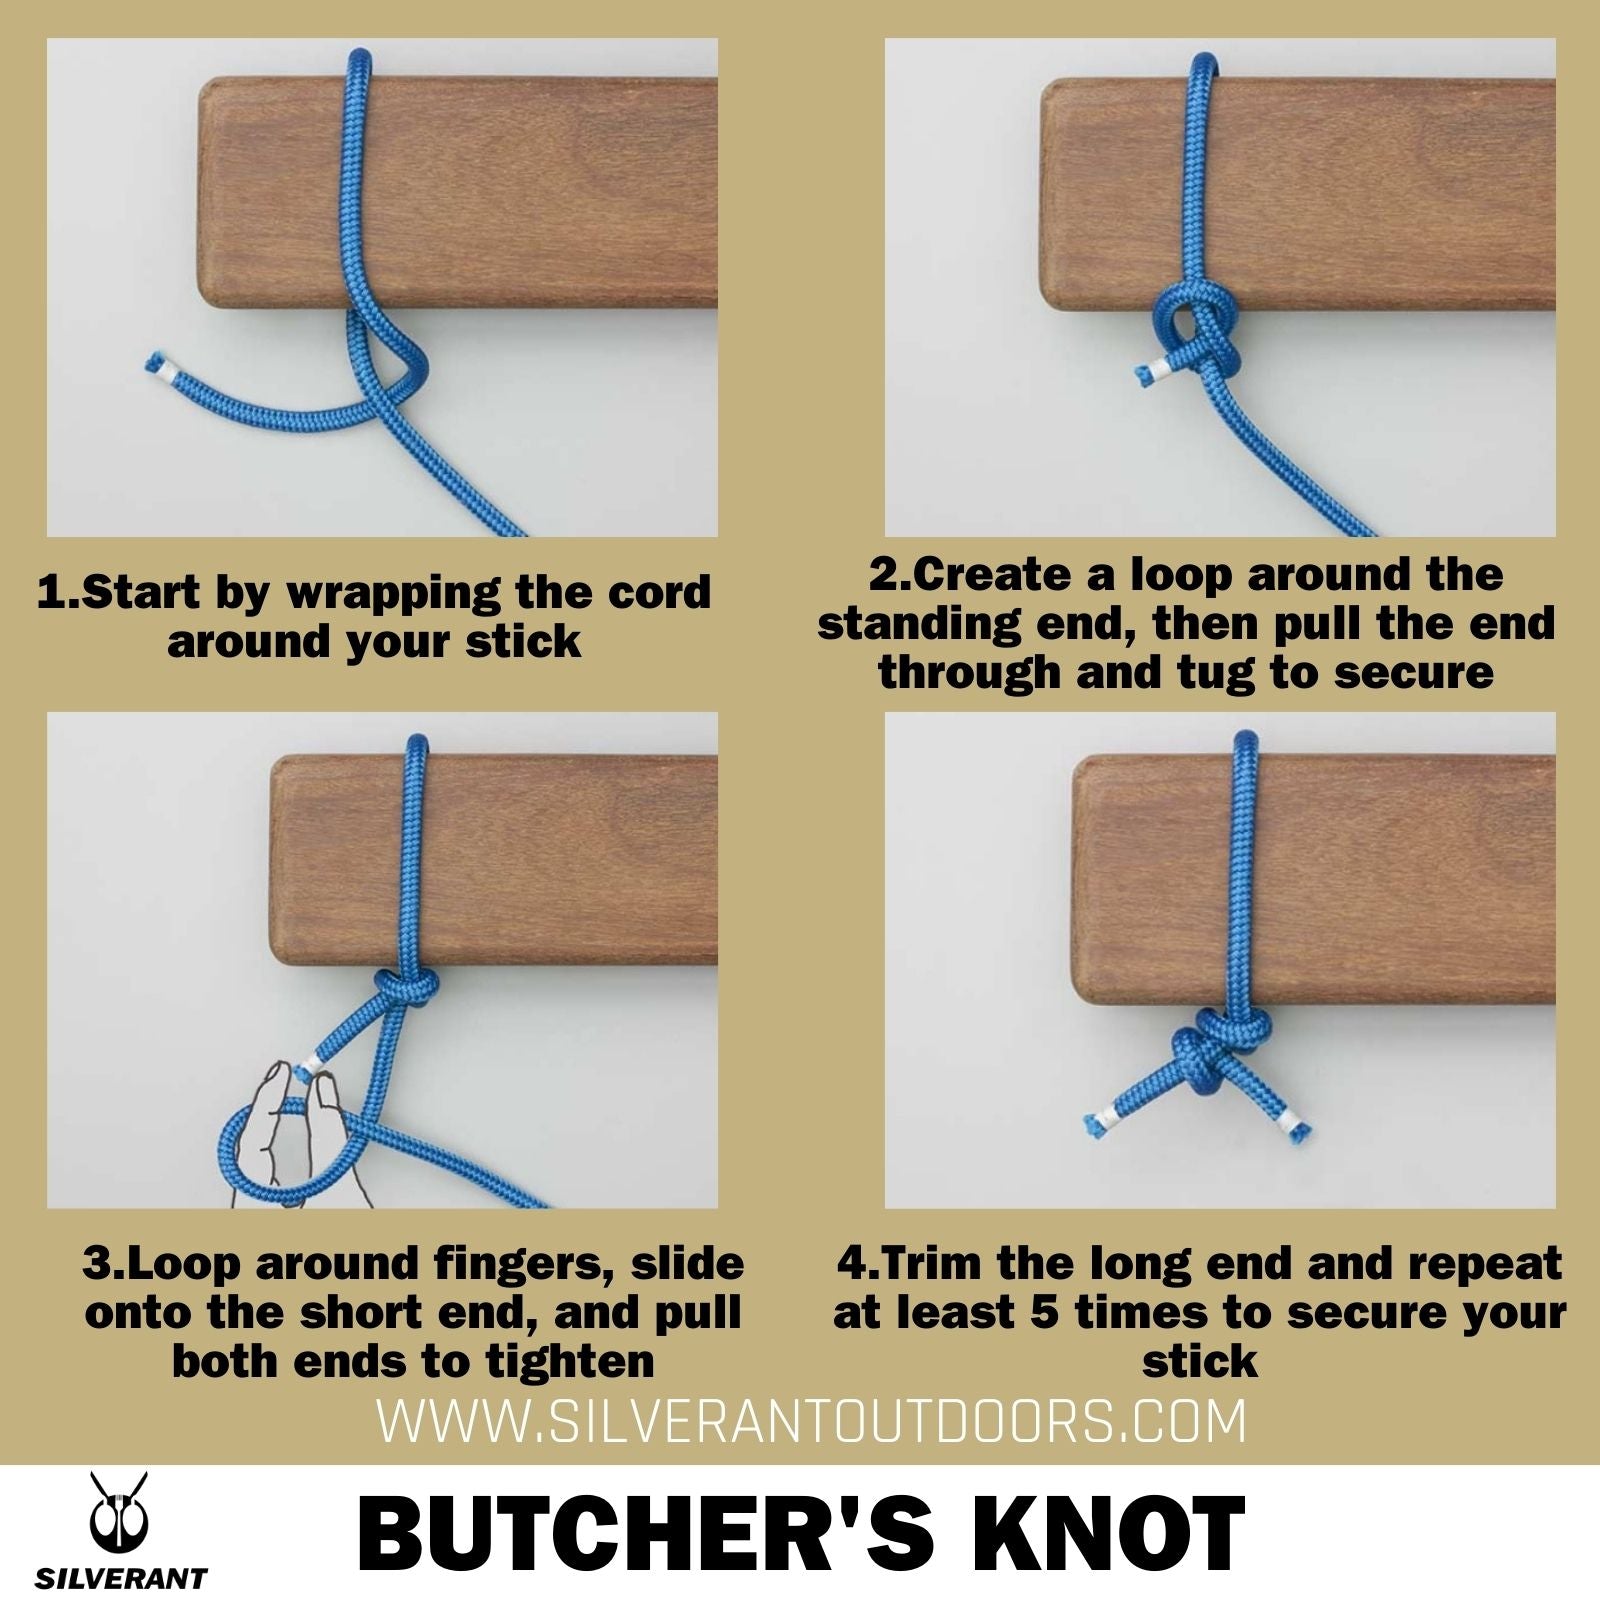
Butcher's knot
Lastly, if you're a roast enthusiast like me during your adventures, you absolutely can't overlook the Butcher's Knot.
Imagine this – a Campfire Stuffed Pork Loin Roast, a boneless pork filled with breadcrumbs, mushrooms, and onions, sizzling over the flames after a day of hiking. It's the dinner dreams are made of.
With the Butcher's Knot, you can wrap up that flavorful roast, keeping all those delicious fillings snug inside.
Toss it in foil, throw it into the campfire, and watch the magic happen – an even, all-round cooking experience.
I have to be honest; the taste is something beyond words. The first chew of that perfectly cooked roast, paired with a bottle of hot sake, surrounded by the campfire vibe – it's like stepping into a dream.
Now, let's get down to tying the Butcher's Knot:
To get things rolling, wrap the cord around your roast.
Next, create a loop around the standing end, then pass the end through it. Give it a good tug to lock things in place.
Then, form a loop around your fingers, slide that loop onto the short end, and pull both ends to tighten the knot.
Last step – trim the long end for a neat finish. Repeat this process at least 5 times to ensure your roast is securely bound.
Easy peasy, and your roast is ready to hit the campfire.
To sum it all up, for your sack, grab the Miller's Knot. When you're dealing with tricky cylindrical stuff, call in the Boa Knot.
And when it's time for that flawless campfire roast, it's Butcher's Knot to the rescue. Easy as pie!
Conclusion
In conclusion, by mastering lashings and binding knots, you can take your adventure to a whole new level.
Whether it's round lashing for extending short poles, diagonal lashing for stabilizing rectangular frames with triangles, or floor lashing for crafting rafts, tabletops, floors, and makeshift bridges, these practical skills open up a world of possibilities.
And let's not forget about the binding knots—they're the cherry on top of your adventure.
Need to secure your sack? Reach for the reliable Miller's Knot. Wrestling with tricky cylindrical items? It's time to bring out the Boa Knot.
And when the campfire calls for that perfect roast, let Butcher's Knot work its magic. It's as simple as pie!
Finally, beyond the art of lashings and binding, feel free to explore our titanium cups, hip flasks, and water bottles to enhance your overall adventure.
If you have stories or tips about your experiences with lashings and bindings, we'd love to hear from you. Feel free to drop us a message or leave a comment.
To your next adventure
Steve